Tour management offers a quick overview on your current disposition.
What is a tour?
A tour consists of one ore multiple destinations, which your vehicle should complete during a set time range. To plan a tour, you must create orders first. An order can be a service order (do a task at a place at a specific time) or a transport order (drive a cargo item from one place to another during a specific time range). The tour is then built upon the order data. Each tour must include at least one order, but there can be multiple to use the driving time efficiently.
Create tours
There are two possibilities to create tours at YellowFox: you can import tours via an interface (see here for further information) or you can create them via the portal. Both kinds of tours are visible at the disposition view at any time. Anyway, tours which were created via interface are not editable by default. As an administrator you can change this setting at the settings view (see settings).
Tour planning at portal
YellowFox does not support automatic tour planning at the moment, but you can plan your tour as you please.
To create and edit tours, some requirements must be met. You as a portal user need the right “edit orders and messages”. To edit tours created via an interface, the respective setting has to be set (see settings). The function range of tours at the portal is bigger than at the interface. That is why some interface tours might not be editable even though the setting is set. This is because the app version of the assigned vehicle is too low. Update the app of the vehicle to solve this problem.
Finished tours can not be edited as well.
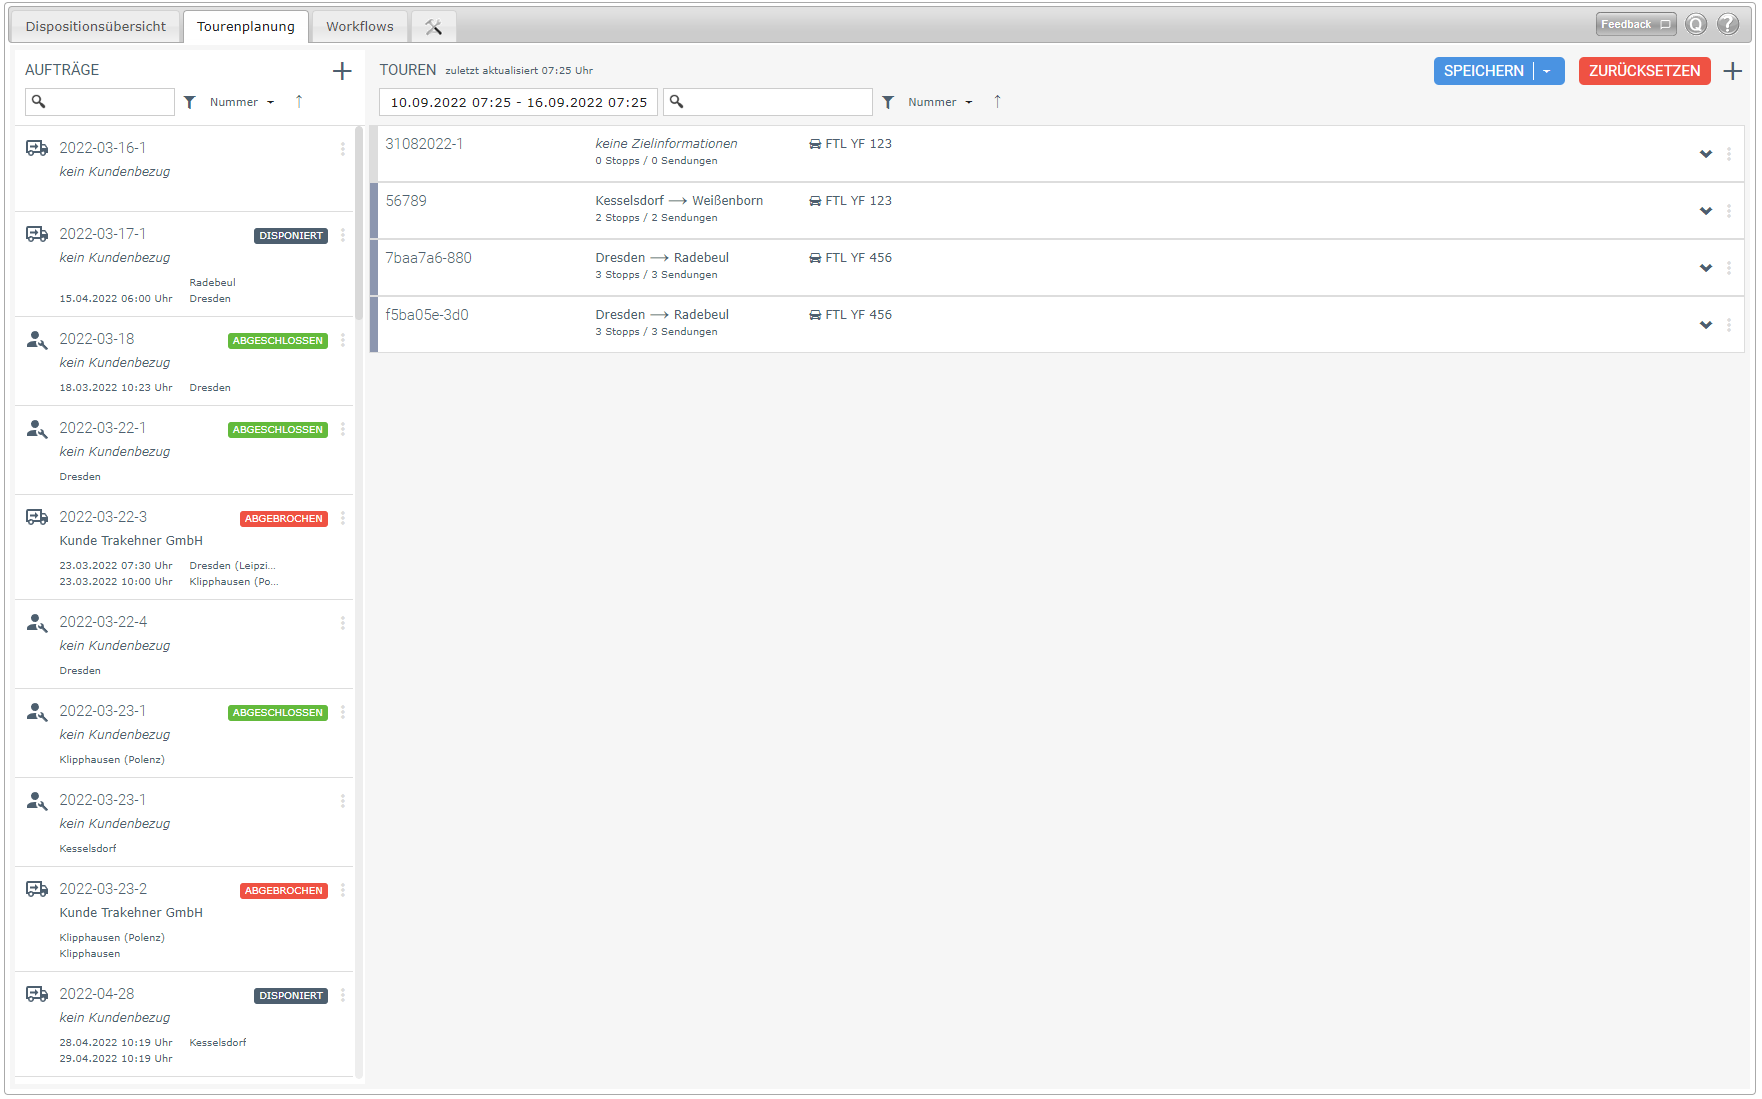
Tour planning view
Tour planning at the portal is located at communication -> tours -> tour planning. You need at least the portal right “see orders and messages” to open this view. To actually interact with tours, you need at least the higher level “edit”, as already mentioned.
Tour planning view consists of 2 areas: on the left you can see your orders, on the right are your tours. At the header of each area are multiple options to restrict the lists. At both areas you can search via a free text search, apply filters, or sort the lists. The tour list has a date picker on top of that.
Filter
Filters are a mighty tool to move fast through tour planning. To apply a filter, hover the filter icon with your mouse. All available filters will be shown. Filters written in italic font are system filters and can neither be edited nor deleted. To select a filter simply click on the related checkbox. You can also combine multiple filters at once. Close the view by leaving the area with your mouse. If a filter was chosen, it will now be applied.
To edit or delete a filter, hover the affected row and click on the respective icon.
Created filters are a personal setting and are only available for yourself.
Create an order
To create a new order, go to tour planning and click on the “+” icon at the top right corner of the order area. Here you can start planning a new order or choose from an existing order draft.
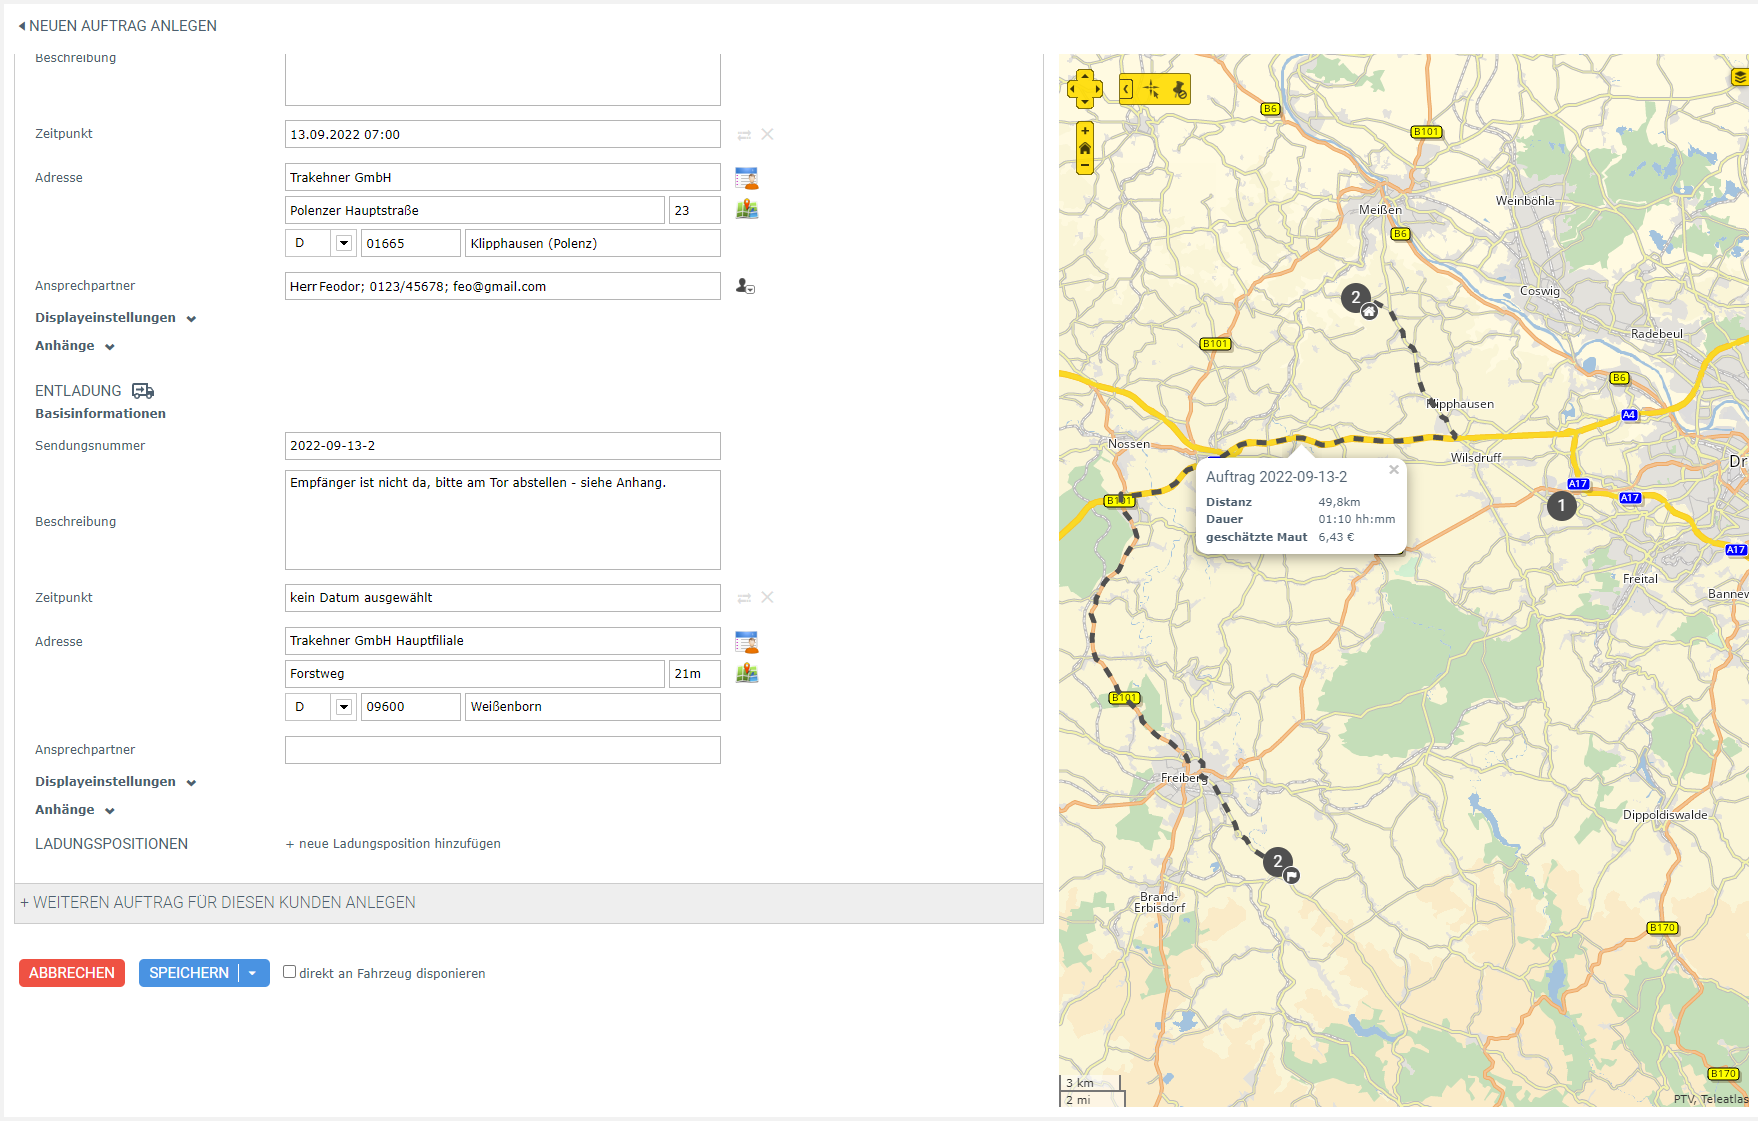
Create a new order
The order editor gives you the possibility to add orders simple and fast. On the left you see the order data. On the map on the right, you can check the to be approached positions.
The first step is to choose a client, which is the instance you are performing the order for. This is not mandatory. You can choose a client from your address book or add a new client. To choose an existing client, click on the address book icon on the right or simply just start typing the clients name and choose it from the list that will open. The address of existing clients can not be altered. If you have entered a new client, it will be added to your address book on save. Please notice, that you need the portal right “edit addresses” to do so.
Now you can add multiple orders for this client. The editor starts with an empty transport order. By clicking at “add another order for this customer”, you can add another. You can also copy the first order by clicking on the three dots at the header and choose “copy order”. Here you can also remove an order, but only if the order has never been saved.
Orders which are created at the same time are still independent from each other. Their similarity is only the same client.
An order consists of the needed order data. Please choose first, if you want to create a transport or a service order. Based on your selection the mask will change. Each order is identified by an order number. You can choose this freely. Afterwards you can add a description with further information. Please notice, that this description is only for internal use at the portal. To add information for your driver, please use the description field at the respective partial order.
Partial orders
A transport order consists of a pick-up and a delivery. A service order consists of the service to be performed. Pick-up, delivery and service are partial orders. They are described by a shipment number, a description, as well as date and address information.
The shipment number is filled automatically while you enter the order number, but you can edit it afterwards if you like. This number will later be used while disposing the order and will also be displayed to the driver.
If your partial order has a due date, you can add this as date information. You can also leave this empty. To choose a point of time, click on the edit field and choose a date from the calendar. To choose a time range, click on the arrow icon on the right first. Now click again on the edit field to choose from a double calendar. To reset the date information, click on the “X” icon.
Now you can choose the address to be approached. Again, you can choose this from your address book, the map or enter a new address. The address is not mandatory. If you enter a customer name, it will be added as a reference to the order. If you enter a new customer name, it will be added to your address book on save. You can also leave the customer empty and just enter an address. If you did choose a customer and are now editing the address, the customer will be cleared.
Now you can add a contact person. This is optional as well. If you have chosen a customer during last step, the existing contact persons will be loaded, and the field will be filled by the first contact person found. Click on the icon on the right to choose another contact person. You can also enter a free text. This has no influence on the address book.
Cargo Items
If you are creating a transport order, you can now add cargo items. These are the goods that should be transported. A cargo item consists of a count, a package item (e.g. an europallet) and an article (e.g. a specific building material). You do not have to add a cargo item, but they can be helpful for later disposing. To add a new cargo item, click on “add new cargo item”. All three fields must be filled. To remove the cargo item, hover it with your mouse and click on the “X” icon. The available package items and articles are managed via the settings. If you allowed your dispatchers to create package items resp. articles dynamically, this option will also be available. If a new entry is created, it will be added to the cargo item management automatically on save and will therefore be available for future use.
Save order
If you are content with your order, you can finish the editor via save. There are three options available:
- Save: The orders are being created and are ready to be disposed. You will return to tour planning.
- Save as draft: The orders will be saved as drafts. Drafts can not be disposed, but they can be used to create new orders at any time.
- Save + create order: The orders are being created and are ready to be disposed. The editor is being cleared and you can add further order, e.g. for another client.
Sometimes it might be needed to quickly add and send an order directly to a vehicle. Please activate "directly dispatch to vehicle" to do so. In this case a small window will open where you can select a vehicle for each order. On submit each order will be transformed to an order automatically and will be sent to the vehcile if selected. You have now skipped the actual tour planning which can help you to act faster.
Create order from draft
If you have chosen this option at the start, the available order drafts will be displayed. Choose one to start with your new order. To edit the draft itself, hover it and click on the three dots at top right. Now you can open the draft in edit mode or even remove it.
Edit orders
As long as your order is not disposed, you can always edit it. Go to tour planning and hover the order you want to edit. Click on the three dots to open the context menu. Here you can also reach the order details to simply display all order information and show the current state if the order is already disposed.
Disposed orders can not be edited as it would influence the tour.
Consecutive order numbers
Setting an order number is mandatory. If you do not want to set the order number manually each time, you can create a consecutive number. First you must set a schema for the number. This setting can be found at the module settings at the tab “general” and is only visible for admins. Here you can create your number from a bunch of components. For example, your number could always contain the current date. Or you could just choose a simple consecutive number - there are countless possibilities. If you set a schema, the order number at creating a new order will always be pre-filled. Please note that this is just a provisional number. If somebody else is creating an order at the same time as you and your schema contains a consecutive number, it might happen that for example you will not get number 10 but 11 because your colleague did press save before you did. The final order number will be displayed after save.
Despite having a number schema you can always edit the number manually. The start value for your consecutive number can also be set at the settings. This allows you to start with a number greater than 1 or to reset the value at any time.
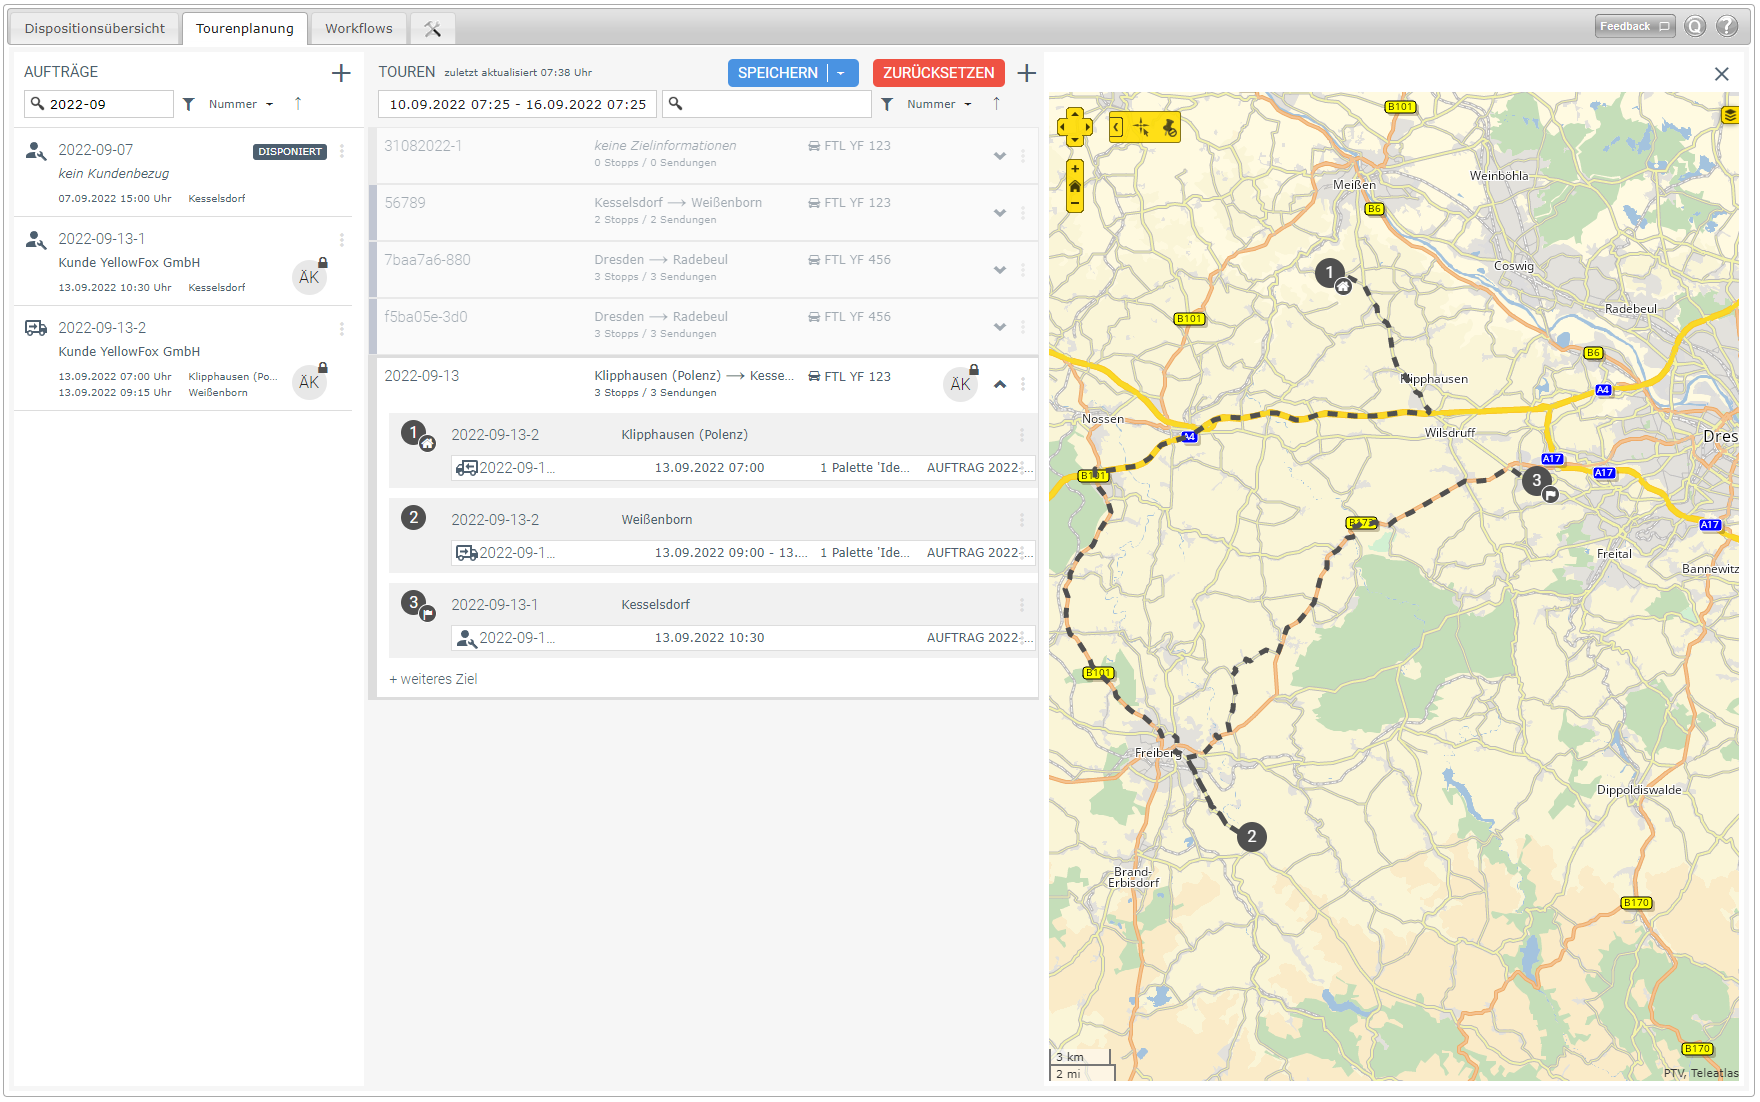
Create and edit tours
To create a new tour, click on the “+” icon at top right corner of the tour area. The tour editor will open, where you can set the basic information of your tour. If you cancel the editor, the tour will be removed. By clicking apply you can start with the actual planning process.
The orders you created earlier can now be disposed by dragging them onto the tour. Tour planning will generate the destinations to approach and the tasks to be fulfilled from the order data automatically. You can now move the destinations and shipments by dragging them to change their order or redispose. The order as it is displayed, is the order the driver will see on his display. To remove a destination or shipment, hover the tour element and open the context menu. Please notice that an order has always to be removed as a whole. This means if you are e.g. trying to remove the pick-up task of a transport order, the delivery will be removed as well. Tour planning will inform you about this and you must confirm this. This restriction does also apply to moving an order from one tour to another – it will always move all included partial orders.
On top of your orders, you can also add empty destinations to your tours. This might be useful to e.g. add a return to your companies facility. To add an empty destination, you have to expand the tour first. Now you can click on the “+” icon in bottom left corner. The addresses you marked as company internal at the address book are available as quick selections. On click the destination editor will open. Confirm the editor to apply the new destination.
Edit tour elements
A tour consists of destinations and shipments. These are tour elements. Each tour element can be edited individually. To edit a tour element, hover it, open the context menu and click on the “edit” option. An editor will open. At top there are always the basic information. Based on the type of the tour element you have chosen, the view will differ.
After the basic information you have the display settings. Here you can set a display name if you want to. If this field is set, the driver will see the display name instead of the actual tour element number. This might be helpful if you are operating with complex tour element numbers during tour planning, but want to show your drivers a simple, easy to understand number. Furthermore, you can set a workflow to manage your drivers working process.
Afterwards you can also add attachments to your tour. This includes forms, file attachments from file storage and objects from the object management.
Lock management
While you are editing a tour, it will be locked to you. In this state no other portal user can interact with it. This prevents multiple changes overwriting each other. A lock to an order or a tour will be displayed by an icon. Hover it to see who locked the element since when.
If you need to edit an element even though it is already locked, you can send a request to the current editor. Click on the lock icon to do so. You will get a notification as soon as the other person responded to your request. In case of confirmation the element will be locked to you automatically.
Click on your own lock icon to release a lock. This will also reset the current editing state! By clicking on “reset” on top right corner you can do this for all tours which are currently being edited by you.
At the portal menu you can see your current notifications. If the current notifications counter turns yellow, tour planning might be trying to tell you something. Click on the notification, to get a quick overview. Here you can see your current locks, the current state of your requests and which requests might have been sent to you.
Locks are dependent on temporal restrictions, see settings.
Save tour planning
To check your planned tour, your have multiple options. Use the context menu of the tour to display the tour details or view the tour on the map. If you are content with your tour, you can finish the planning process by clicking on save. A dialogue will open which shows you all tours which will be saved. Tour planning will do an error check. If there are any problems left, they will be displayed. These might include e.g. an attached form which is not compatible with the selected vehicle. All problems must be solved before you can continue.
In this dialogue you are also able to select if the tours should be sent to the displays right away. You can also send the tours later on via the disposition view. Close the dialogue via “confirm”. Tour planning will now persist your changes and send them if selected. Please wait until this process is finished. The portal will inform you on successful completion and reload the view afterwards.
Reference tours and copy tours
If you have recurring tours, it might be helpful to copy them. Click on “Copy tour” at the action menu of the tour to do so. This automatically copies the tour and all orders that are included, so that you do not have to gather all orders manually again. The new orders will get a consecutive order number. To adjust it or other data of the order or the shipments, use the action “Edit shipment”. If you are happy with your copy, click on “Save” like usually. This will persist your copy.
To find your recurring tours faster, you can mark them as a reference. Click on “Mark as reference tour” at the tour action menu to do so. The tour will now be highlighted by a new symbol. You can find reference tours by using a filter. To create a new tour from a reference tour, click on “Create tour from reference tour” instead of “Create new tour”. Then you can choose the reference to use from a list. Creating a tour from a reference is basically the same as copying a tour. Marking it as reference just helps you to find it faster. To remove the reference flag, just use the action menu again and click on “Remove as reference tour”.
After copying a tour resp. creating it from a reference tour, it will not have any relation to the original tour anymore. This means that if you edit the original, it will not affect the copy.
disposition overview
At the disposition overview you are able to view the current progress of your tours. There are two different views available - the sliding graph and the table. Both own different configuration possibilities, which you can find in the upper area of the module.
menu
The menu consists of a vehicle group and date selection, as well as a free-text search and a settings menu. The vehicle group, date and search text influence both views. Those settings will not be remembered for future sessions.
Via the settings menu on top right corner you can set a pre-selected vehicle group and a date range, which will be loaded on each module start. Settings are structured into 3 areas:
- general: those settings influence both views
- sliding graph
- zoom: defines the stretching of the time line
- displayed car information: This edits the vehicle list on the left. Choose wether you want to see driver and trailer informations or if you e.g. want to hide the vehicle symbols for a compact view.
- displayed tour information: This edits the individual tours, which are shown on the sliding graph. Decide which details you want to see on first glance. It is also possible to hide all detail data, this results in an especially slim mode, in which each tour is only a line.
- table
- pre-defined timerange: The module always inits on start at "now". This setting influences how many hours more and less will be pre-selected.
- displayed lines per page: Set the maximum of table entries per page.
- displayed columns: The table view is completely user-definable. Show and hide the columns you want. Click and drag the columns via the 3 dots to change their order.
On save the settings of all 3 areas will be applied. Afterwards the module will be reloaded.
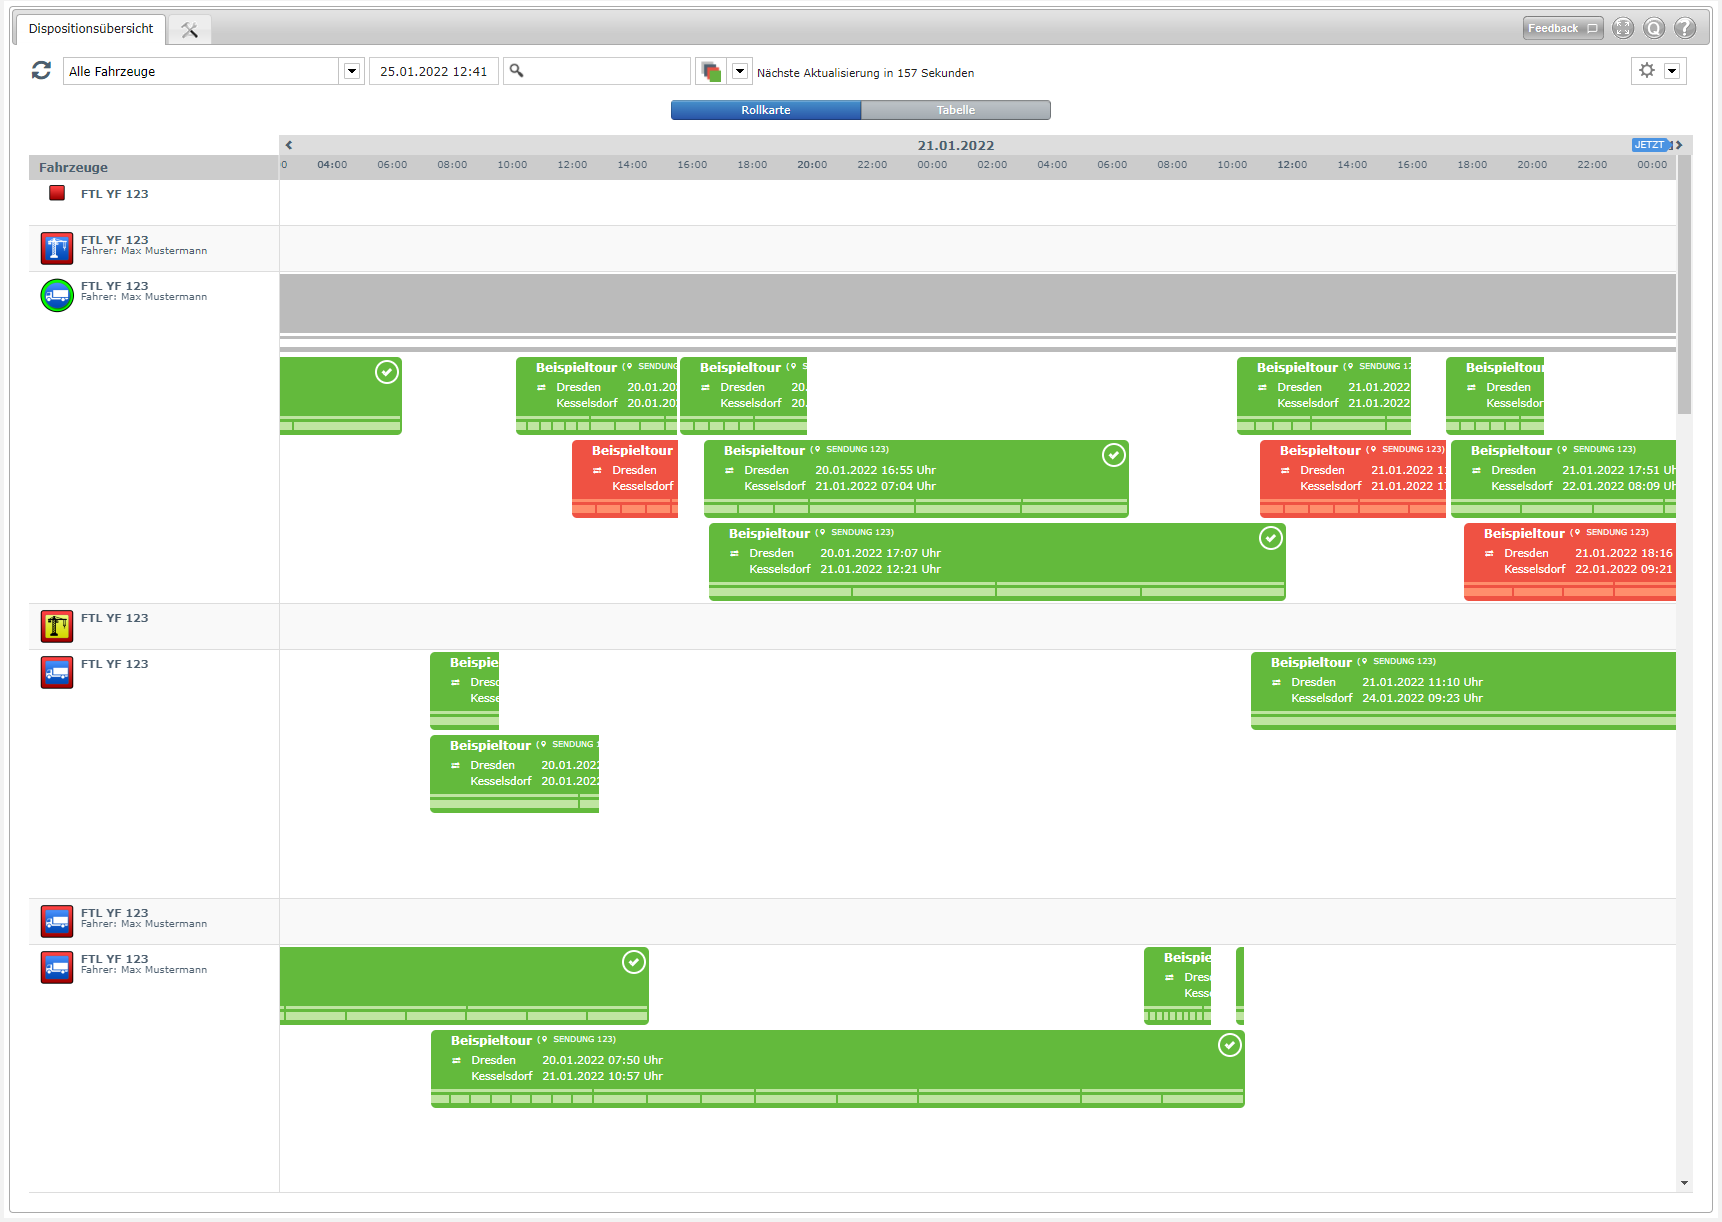
sliding graph
View as sliding graph reminds of old times. Click on an empty area and drag the graph as much as you want. By doing so you can also view old and upcoming disposition data. To get more details on a tour, click on the corresponding tour block.
Choose a date via the date picker above and click on apply to center the graph at the selected point of time.
symbolism
As mentioned before, you are able to edit the displayed tour information. We now want to explain the meaning of these options.
| information | description | |
|---|---|---|
| color | Tours can have the following colors:
| |
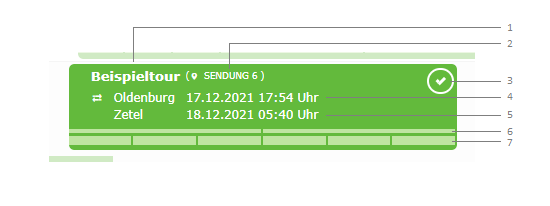
| 1 | tour name | Tour ident which was set while creating. |
| 2 | current stop | The partial order to which the last submitted state belongs. |
| 3 | status | The state is visualized by an icon. For planned/active tours you will see the current progress, e.g. 4/8. |
| 4 | start | Address of first destination. start date of tour |
| 5 | end | Address of last destination, date when tour was finished |
| 6 | sub destinations | Each destination is visualized by a part of the line. The tour in the picture has 2 destinations. |
| 7 | partial orders | Each partial order is also visualized by a line part. These are sorted underneath the destination they belong to. The tour in the picture has 3 orders at each destination. |
table
The table view processes the data differently. Here you can view also larger timeranges. On change back to sliding graph, the graph will be centered at middle of the previous timerange.
Using the action menu in last column you can access the detail and map view of the tour.
detail view
The detail view holds all facts about your tour. These are structured into 3 areas:
- planning: Here you can find all information that were initially set for the tour. By looking at the time line and the last state per tour element, you will get a quick overview about the current progress. For more detailled information on the working progress you can find all registered status entries at each element. These can also be viewed grouped at the next area.
- history: This contains all status entries ordered chronologically. At the middle column is a hint which tour element originally send this status. Click on the text, to see the detail information of previous area again.
- data: Here you will find all attachments to the tour. This includes submitted forms, but also attached files from file storage.
By clicking the map icon on top right you can access the map view of the tour. Here you can see all destinations, as far as a latitude and longitude were entered, and all registered position messages while the driver was working on the tour. Click on a destination icon to see the detailed data again.
settings
General
Here you can set personal and company-wide settings. Company-wide settings are only available if you own the administrator right.
Personal settings
- Show orders: Select here if you want to see orders from old order management. If you have checked this option, all orders will be displayed along with the tours in the disposition view. This does not influence old order management. Orders from old order management will not be displayed in tour planning.
Company-wide settings
- Create package items dynamically: Set here if your dispatchers should be able to create new package items during order acquisition or only use existing package items.
- Create articles dynamically: Set here if your dispatchers should be able to create new articles during order acquisition or only use existing articles.
- Edit interface tours: Set here if tours inserted via interface should be editable at the portal. Please notice that this is a very sensitive setting. Make sure that changed data is synchronised with your system.
Consecutive order number: Here you can set a schema for your consecutive order number. You can find more details at Create an order → consecutive order number.
tour states
Here you can set your tour state configuration. This defines your base set of possible tour states, which will be offered to your drivers on their display.
You can choose between different TMS providers, who communicate with us via interfaces. The selection of the right TMS is important for a smooth exchange of data between YellowFox and the TMS. If you do not need this, you might also choose your default order states.
Loaded configurations can be adjusted afterwards. The interfaces rely on the given idents. But you can change the shown texts as you desire and even add translations for other languages. If the driver uses the display in a matching language, the translation will be displayed. The default if no translation for the selected language is available is always the german text.
The configuration has to be transmitted to the display, before it can be used. This also applies for possible updates on the configuration!
The configured tour states are the default for new tours on the display. They might be overwritten if the tour contains a custom tour states configuration or has an attached workflow.
Display settings
Status messages and workflows
This view is only available for administrators.
A driver who is working on a tour is sending his current status by pressing a specific status on his display. There are multiple options how you can add the available status messages. Each display owns a default status configuration, which must be sent to it once (see tour states).
To help the driver you can add a workflow to a tour, destination, or shipment. A workflow specifies the order in which specific tasks must be done and minifies the risk of faulty inputs (see workflows). Workflows are a complex topic which you might not want to care about during tour planning process. That is why you are able to set default workflows, which are appended automatically on creating a new order or tour, without having to set them individually. Of course, you can still change them if you want to. You can set a default workflow for each tour element and the different types of partial orders. If the selection is set to “without default”, the display will fall back on its own default status configuration.
Package items
Here you can manage the available package items. This view is only available for administrators.
A package item is building a loading entity for transport. Multiple goods can be combined to one. A possible package item is e.g. an europallet or a normed container size.
At package item management you can create these package items. Each package item is defined by a name. The name must be unique. You can remove package items as well. This does not influence tours and orders which already use this package item, but you can not create new orders which include it.
Articles
Here you can manage the available articles. This view is only available for administrators.
An article is a good which should be transported. This might be a specific building material like gravel or sand, or in food industry a specific food item.
At article management you can create these articles. Each article is defined by a name. The name must be unique. You can remove articles as well. This does not influence tours and orders which already use this article, but you can not create new orders which include it.
Tour planning
Lock management
This view is only available for administrators.
While editing a tour it will be locked to you. This allows an uncomplicated, collaborative working space, without the risk of changes overwriting each other. If it is needed to edit an already locked tour, a request can be sent. Here you can set after which timespan the locks and requests should expire. While the dispatcher is actively editing at tour planning, a lock can never expire. Even after this it might be needed to hold a lock, for example while the dispatcher takes a break. But it might also happen that he just forgot about the tour. Here it can be useful to set an interval after which the lock will expire automatically. This does also include resetting the working state. You might set that this will never happen.
By clicking on “show current locks” you can see all company-wide locks and requests and edit them manually.