Mein YellowFox
Inhaltsverzeichnis
Mittels des Dashboards können Sie Ihre individuelle Startseite festlegen.
Einleitung
Das Dashboard ist Ihre individuelle Startseite. Standardmäßig starten Sie mit einem Blick auf die Übersichtskarte. Sie können das Dashboard jedoch auch selbst definieren und bis zu 4 verschiedene Inhalte anzeigen lassen. Außerdem haben Sie die Möglichkeit mehrere Dashboards anzulegen, zwischen welchen Sie schnell wechseln können. So können Sie alle Aspekte Ihrer Flotte schnell und einfach im Blick behalten.
Dashboards verwalten
(Abbildung 1)
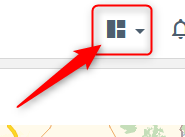
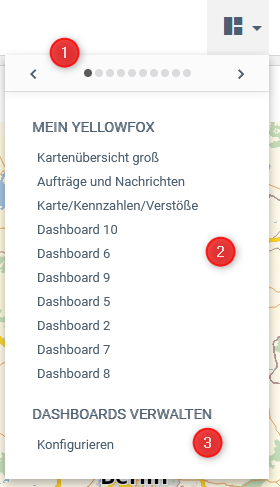
Beim ersten Anmelden in das Portal hat jeder Benutzer ein Dashboard mit der Übersichtskarte. Um weitere Dashboards zu erstellen, bearbeiten oder aufzulisten, ist der klicken Sie auf das Symbol oben rechts (siehe Abbildung 1). Es öffnet sich in einem Dialog die Übersicht der eigenen angelegten Dashboards (ähnlich der Abbildung 2).
Dashboardübersicht
(Abbildung 3)
(Abbildung 2)
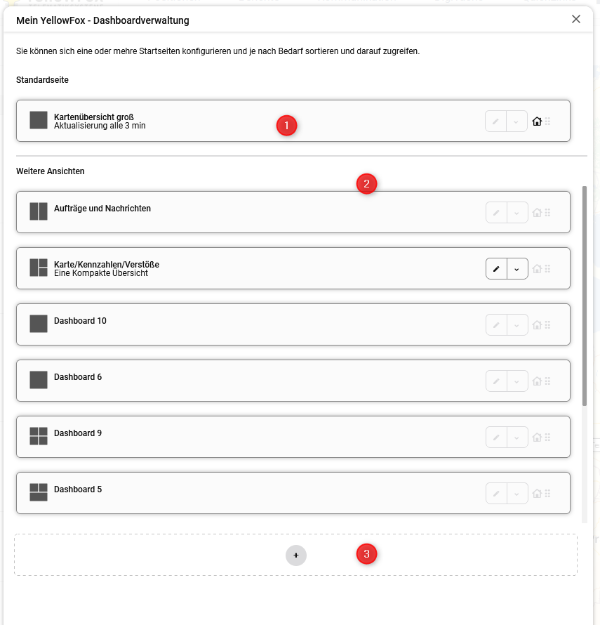
Um Dashboards anlegen und bearbeiten zu können, klicken Sie unter Dashboards Verwalten auf Konfiguration (Abbildung 2 Punkt 3). Es öffnet sich ein Dialog (Abbildung 3).
Hier erhalten Sie zunächst eine Übersicht über all Ihre Dashboards: Das oberste Dashboard ist Ihre Startansicht. Damit starten Sie, wenn Sie sich einloggen (Abb. 3, Punkt 1). Darunter sehen Sie unter Weitere Ansichten Ihre restlichen Dashboards. Die Reihenfolge ist identisch zu der, die beim Wechseln zwischen den Dashboards genutzt wird. Sie können die Reihenfolge daher per Drag-and.-Drop verändern. (Abb. 3, Punkt 2) In dem untersten Bereich kann mit Klick auf das Plus-Symbol ein neues Dashboard angelegt werden.
Jedes Dashboard-Element in der Übersicht enthält folgende Funktionen. Über das Icon unter Punkt 1 können Sie per Drag-and-Drop die Reihenfolge der Elemente verändern. Über das Haus-Symbol unter Punkt 2 können Sie das Dashboard als Startansicht festlegen. Das bis dato aktuelle Startdashboard rutscht dazu unter Weitere Ansichten an die oberste Position.

Weitere Aktionen:
| Inhalt ändern | Damit gelangt man sofort in Schritt 2 des Editors um den Namen, die Beschreibung oder den Inhalt der Dashboard-Bereiche zu ändern. Der Stift im Drop-Down Element ist auch ein direkter Sprung dahin. |
|---|---|
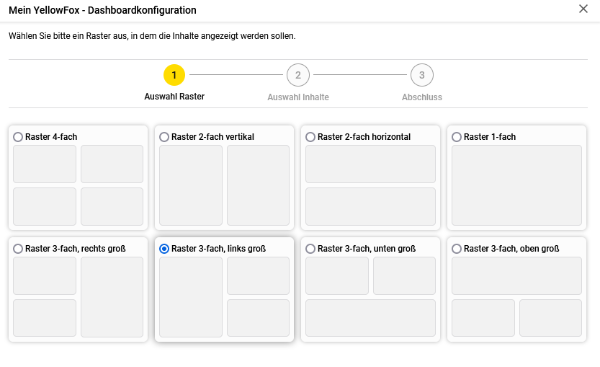
| Raster ändern | Damit gelangt man in Schritt 1 des Editors - Hier kann das Dashboard-Raster aus acht Möglichkeiten gewählt werden. |
| Duplizieren | Damit wird ein Dashboard-Element kopiert und als weiteres Dashboard angelegt. Sie können anschließend die Kopie bearbeiten wenn Sie das möchten. |
| Löschen | Nach einer Sicherheitsabfrage, wird nach der Bestätigung das Dashboard unwiderruflich entfernt. |
Dashboard erstellen oder bearbeiten
(Abbildung 4)
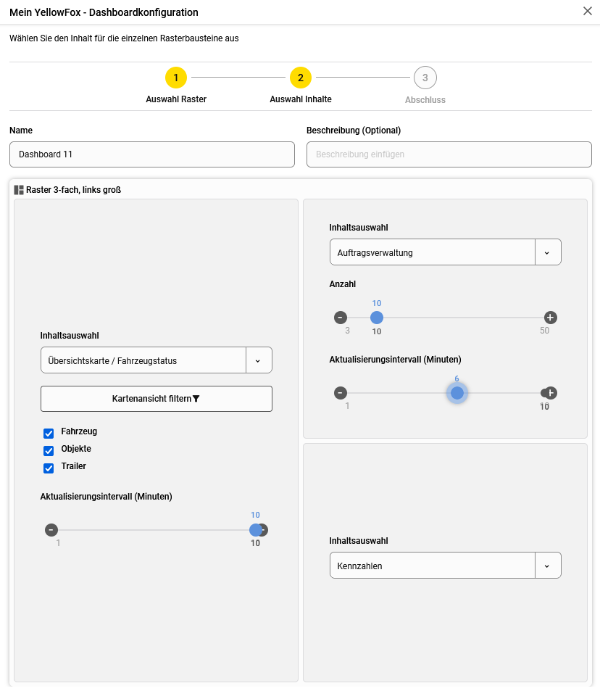
Das Anlegen eines Dashboards unterteilt sich in drei Schritte:
| Schritt 1 | Festlegen der Auswahl eines Rasters für das neue Dashboard. Es gibt acht Möglichkeiten, wie Inhalte im Dashboard dargestellt werden sollen. Wenn Sie das "Raster 1-fach" wählen, können Sie statt einem Dashboard-Inhalt auch auf ein Modul wie beispielsweise die Zeiterfassung verlinken. Dadurch können Sie direkt bei Login in ein Modul wechseln. | |||||||||||||||||||||
|---|---|---|---|---|---|---|---|---|---|---|---|---|---|---|---|---|---|---|---|---|---|---|
| Schritt 2 | Hier legen Sie den Namen des Dashboards fest. Dieser ist Pflicht. Optional können Sie auch einen Beschreibungstext hinzufügen. Für die einzelnen Bereiche muss ein gewünschter Inhalt über die Auswahlbox gewählt werden. Mögliche Inhaltsauswahl
| |||||||||||||||||||||
| Schritt 3 | Wurde das Dashboard erfolgreich gespeichert, so sehen Sie hier eine Bestätigung dazu und können zur Übersicht zurückkehren. |
Möchten Sie die Mein Yellowfox - Dashboardkonfiguration verlassen ohne zu speichern, klicken Sie oben rechts auf das X-Symbol und Sie werden nochmal gefragt, ob Sie die Eingaben
verwerfen wollen, um zur Übersicht der Dashboards zurück zu gelangen.
Dashboards nutzen
(Abbildung 5)
Das Dashboard ist Ihre individuelle Startseite bei Login. Sie kehren auch durch Klick auf das YellowFox-Logo oben links im Portal dahin zurück. Um zwischen verschiedenen Dashboards zu wechseln, haben Sie mehrere Möglichkeiten.
Dashboard direkt auswählen
Klicken Sie auf den Namen des Dashboards (Abbildung 2) um direkt dahin zu wechseln. So können Sie schnell zu einem bestimmten Dashboard wechseln.
Dashboards durchschalten
Basierend auf der definierten Reihenfolge der Dashboards, können Sie die Dashboards auch Stück für Stück durchschalten. Nutzen Sie dazu die Pfeile in der Liste der Dashboards (Abbildung 2) oder alternativ auch die Pfeile am Bildschirmrand. Wenn Sie sich den Rand des Browsers links und rechts genau anschauen, erkennen Sie auf einer hellgrauen Leiste drei Punkte. Diese markieren eine Schaltfläche zum Wechseln der Dashboards. Wird der Maus-Cursor über diese drei Punkte bewegt, so klappt sich eine halbrunde Schaltfläche mit einem Pfeil auf. Mit einem Klick auf die linke Seite gelangt man zum vorherigem Dashboard und auf der rechten Seite zum nächstem.


